What You Need To Know
What You Need To Know About Do It Yourself Tub Reglazing/Resurfacing
This page is dedicated to helping individuals that like to undertake do it yourself projects. As you approach the bathtub reglazing process (also known as bathtub resurfacing or bathtub refinishing) there are a few things to keep in mind. In order to Do It Your Self properly. You will want a product that follows the QPP Standards
The QPP Best Practices of Tub Regalzing
- Quality Product
- Professional Tools
- Proper Process
Standard 1: Defining Quality
Quality Reglazing Product
- Durability – a product that will not flake away or crack
- Flexibility – the ability to adapt to extreme temperature changes (e.g. when you turn on hot water in the tub)
Standard 2: Professional Products
Professional Tools
- Extraction System – exhaust fan
- HVLP (Wagner Capspray 9100)
- Ridgid 5″ Orbital sander
- Craftsman Vacuum 4 gallon wet/dry
- Good scraping tool
- Carpenters knife
- Handheld Hand Masker
- Proper Resurfacing Product
Standard 3: Process Controls
Proper Process
- Step 1: Removing Silicon – Professional Grade Digested to dissolve the silicon around the tub and tile.
- Step 2: Polyclean Clean the Tub – A Mild acid wash to remove any soap scum contaminants .
- Step 3: Drying the tub – Use a hair dryer and terry cloth towels. Terry cloth towels absorb more water in a pinch and the hair dryer finishes the job. If the tub is not completely dry when you apply the acid etch, the moisture will deactivate the acid preventing the etching.
- Step 4: Acid Etching (ensure step 3 is done right) – Applied with a brush or a roller to ensure even coating on all cleaned surface of the tub.
- Step 5: Thorough Rinse – Ensure all acid etch is off the tub.
- Step 6: Dry Tub Again – Use the terry cloth towels and hair dyer to ensure total dried surface.
- Step 7: Sand the Tub – Sand the tub with an orbital sander and 80 grit sand paper. It removes the acid residue.
- Step 8: Make All Chip Repairs – Use a poly filler (not included in all DIY kits).
- Step 9: Sand the Chips Repaired – Use a 150 grit sand paper
- Step 10: Cover Water Entry Points – Use a latex glove and tape to ensure no water leaks from shower head or bathtub faucet. Also cover walls, toilet, sink, and floor to protect from overspray.
- Step 11: Blow Out Cracks – Used air hose to blow out water stuck between tile and tub.
- Step 12: Surface Prep – Wiping the tub with prepping solvent such as 100% alcohol.’
- Step 13: Vacuum The Tub – Tac cloth or vacuum the tub to ensure that it is perfectly clean. Like a clean room. No dust or residue from the drying towels should be present.
- Step 14: Bonding Agent – Apply professional grade poly bond, bonding agent. This ensure that the finish coat will properly adhere to the tub. Make sure the bonding agent is dry to the touch (about 10 minutes)
- Step 15: Top Coat – Use a professional grade HPLV system the Capspray 9100 is a good one.
Do It Yourself Tub Resurfacing Summary Analysis
Cost
- 2 x brushes = $14.00
- 1 x roller = $8.00
- 1 x respirator = $45.00
- 1 x protective gloves = $3.00
- 1 x eyeware = $3.00
- 1 x sand paper = $5.00
- 5 x Time = ???
Pros
- Cheaper Paint Cost
- Cheaper Equipment Cost
- Shorter Process
- Less Research
Cons
- Extra Stripping Costs
- No Acid Etching
- No Bonding Agent
- Peels Under High Tempature
- Not Moisture Sensitive
- No Exhaust System (harsh chemicals)
- Longer drying time (36 hours)
- 2-3 month life expectancy
Homax Tub Resurfacing: Do It Yourself Kit
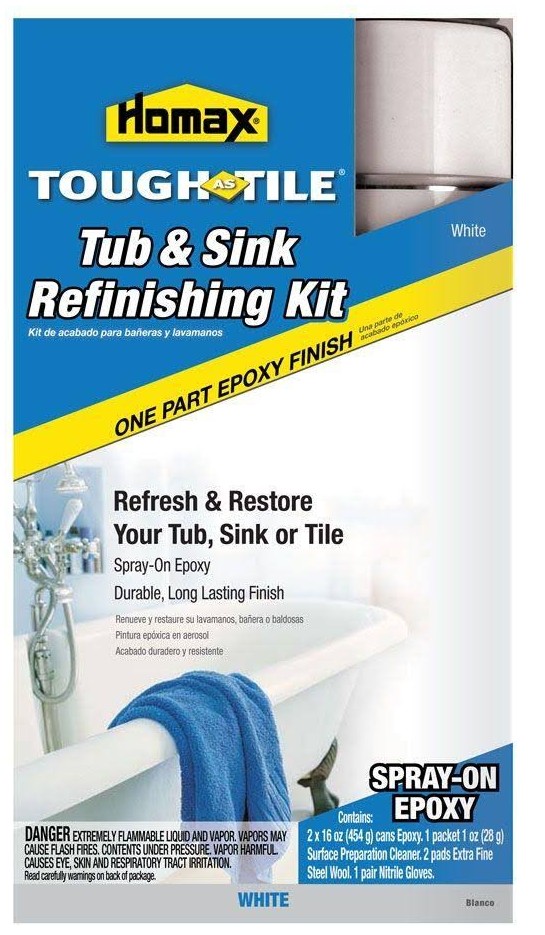
Today we’re going to break down three of the most commonly purchased do it yourself bathtub resurfacing kits. The first product we’re going to breakdown is made by Homax, a do it yourself tub/sink refinishing kit. This is a one part of proxy. The refinishing/reglazing tub kit states that you will need the following materials: a paintbrush, roller, steel wool, and respirator. In my professional opinion, this kit does not provide two of the key Ingredients all industrial/professional products should use. These include an acid etching cream and a proper bonding agent (AKA primer).
The importance of acid etching is to create millions of small porous holes in the porcelain surface. This ensure that the product is bonding to the tub correctly. There is no resurfacing product that will bond to a porcelain surface without the proper bonding agent. It is important to use a POLY BOND wipe on primer to ensure proper adhesion. These two steps are essential if one is to properly resurface a bath tub by themselves. Homax recommends best results by utilizing the brush, roller or a HVLP.
As a professional who has been working in the industry for 13 years we have learned a few things. One, the roller method will leave nap and an uneven finish; especially if you are not used to applying the product. The brush that should be used costs about $12.00, which most people don’t have to spend. So they use a cheap $.99 brush, the bristles of which, will deteriorate and land in the finish. This is especially frustrating , since you will have to recoat the tub numerous times. This will result in more product usage, more time, and more headache.
Homax Review
By: Christopher Hill
![]()
I do DIY projects all the time and tried taking on this one (twice). Each time, it looked/functioned great for about 6 months, then the paint began peeling/chipping away. Do not buy unless you are looking for short-term coverage.
By: Keep Looking
![]()
Lots of overspray, make sure EVERY surface is covered prior to painting. Use only a high quality VOC mask or your IQ will definitely suffer. Once done, this paint chips EXTREMELY easily. Despite following prep instructions to the T, a patch started peeling after a two weeks and I soon had several nicks/flakes. I ended up redoing mine in good old Rust-Oleum gloss. It holds up a lot better and no chips or peels from the Rust-Oleum. The RO is much cheaper and dries much quicker.
By: Nathan
![]()
About a year ago, I was re-modeling my kid’s restroom. I gutted the entire room and installed new drywall, plumbing, tile, fixtures, and cabinets. The only thing I did not replace was the bath tub because at the time it did not appear that bad. Once all of the work was completed (including a new bathtub surround) my wife and I noticed just how bad our tub really looked. I found the Tough as Tile spray on enamel at our local Home Depot and decided to give it a try. I followed the instructions to a “T”, sanding and cleaning the tub multiple times as per the instructions. Once I sprayed on the enamel and it completed drying the results looked amazing, but it only lasted about a week. The whole tub began peeling and little flakes of paint started floating in the bath water with my small children. Now my tub looks horrible and I will have to tear up my new bathroom again to install a new tub. Please, learn from my mistake and do not use this product.
Tile Doc Tub Resurfacing: Do It Yourself Kit
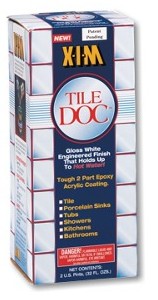
The second do it yourself bathtub reglazing kit is Tile Doc. This is a two part epoxy acrylic. This requires Part A and Part B to be mixed together. Recommended application is with a brush or with a conventional HVLP sprayer. This kit does not include any Etch or Primer. This product costs approximately $50.89 and can be purchased at Sherwin Williams or on the internet. Recommended dry time is 72 hours.
When you open the box you will be surprised. Instead of a list of needful supplies for getting the job done, it makes the suggestion that you should apply an etch create (which they don’t include) and a bonder/primer (which is also not included). They recommend that you contact XIM (the manufactureer) in inquire about the prices and purchasing of all extra/required products.
Tile Doc Reviews
By: Anonymous Reviewer
![]()
It seems to have dried to a firm finish for a shower pan that is weak due to cracking. It will likely suffice for a guest bathroom that is not use frequently. Ask me again in 6 months if it held up!
By: Anonymous Reviewer
![]()
I was told about this product haven’t yet to use it but will be in 3 bathrooms. If all goes well ill use in all apt rentals I have. Going by the pics it looks like it’ll work. I’ll respond back next week.
Rustoleum Tub and Tile Tub Resurfacing: Do It Yourself Kit
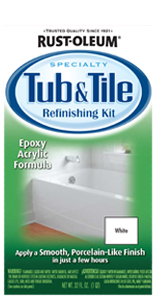
The third do it yourself bathtub reglazing/resurfacing kit is Rust-oleum refinishing kit. This kit has an extensive amount of needed supplies such as: bleach, abrasive cleaner and pad, lime-a-way, tac cloth, latex gloves, a roller, a paint brush, a fan, or an HVLP airless sprayer. This kit does not include any Etch or Primer. This kit can be purchased at Menards or on the internet. Recommended dry time is 72 hours.
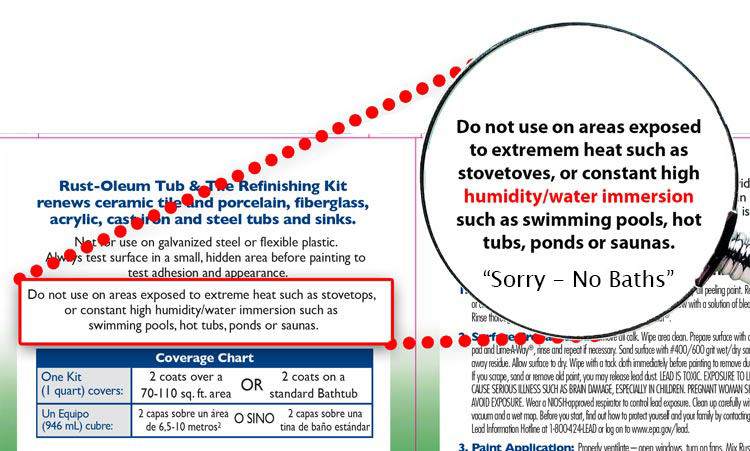
This two part expoxy acrylic does great on low use areas that do not get a lot of humidity, water immersion such as bathing, and has a high failure rate on shower walls. The issue with any do it yourself product, as described in detail above, is the lack of etch, proper surface preperation, and bonding. Great for sinks, limited use counter tops, wall tiles that will not get wet. The disclaimer on the box states
Be sure to read the reviews on Amazons website. Don’t be fulled by the ease of application reviews and the 241 5 star reviews. Consider the customers that took the time to come back and write reviews 6 months later. All reviews after 3-6 months are negative. Pay close attention to the repetition in both the postiive reviews and negative reviews to find the truth!
Do not use on areas exposed to extreme heat such as stovetops, or constant high humidity/water immersion such as swimming pools, hot tubs, ponds or saunas.
Rust-oleum Reviews
By: Regijo
![]()
This is an update to the original review. I can no longer stand by this product. After a few months, the bathtub was flaking. I had to get a professional to refinish my tub. If you want it done right, get a professional.
By: R. Kauffmann
![]()
I was told about this product haven’t yet to use it but will be in 3 bathrooms. If all goes well ill use in all apt rentals I have. Going by the pics it looks like it’ll work. I’ll respond back next week.
By: David Brown
![]()
I’ve used several of these kits on a couple of tubs, and I’m a pro furniture builder and finisher. I challenge anyone – especially the Rustoleum customer service reps – to get a truly smooth, uniform finish using a brush or roller. In fact, show me a smooth roller that won’t disintegrate or detach using this product. As far as I can determine, only a hvlp setup with a practiced hand is going to give you an acceptable finish that might qualify as a good refinish. I also had a long circular discussion with a rep trying to figure how a window (exhaust) fan can be recommended for use with a flammable product. Maybe it’s just me.